Showing posts with label ELL. Show all posts

Friday, June 30, 2017

Modifying Instruction for Newcomer ELLs: Comprehensible Input


I'm sorry for having such a huge gap between my first two newcomer posts, and this one. The end of the school year was just so darn busy! The second tip I shared in the wayback to help you modify instruction for ELLs is to use comprehensible input, so that's what we'll focus on today.

What is "comprehensible input"?
Comprehensible input is a hypothesis of second language acquisition first proposed by Stephen Krashen in the early 80's. The hypothesis states that our ELLs learn and acquire language when they receive input (written or oral) that is only slightly above their current language level (i+1). In other words, the oral and written input we provide students should be mostly understandable, with only a few words or structures that are unknown or new to the student. Students will be able to understand the message, and will acquire new language in the process.

At the newcomer level, comprehensible input is comprised of short, simple sentences, known or learned words and phrases (i), with a few new words or language structures added to get that +1 in the i+1.

This video, while it is foreign language teachers discussing the use of the target language and comprehensible input, is a really excellent illustration of how you can make content comprehensible in the target language for ANY language learner- whether it's a student acquiring English as a second language, or a student acquiring a foreign language.


Why is comprehensible input important? 
The image below illustrates about how much a newcomer student might be able to understand when attention is not given to ensuring that the input is comprehensible.
As you can see, the student is really only understanding high frequency words, a few numbers, and some articles and common prepositions. Is the newcomer understanding enough in this scenario to learn new information? Is the newcomer understanding enough to even know what they're being asked to do? At best, we can tell that it seems like some sort of math problem.

When the input a newcomer receives is not comprehensible, they're likely to simply shut down. When the student shuts down, no further learning is possible- of language or content.

How can I make the input I provide to my newcomers comprehensible? 
There are many ways to ensure that the input you provide your students is comprehensible. The image below shows a few.

You can also provide visuals with oral or written input (visuals, visuals, visuals!). In one of the schools that I worked with this past year, the ESOL department chair created a shared Google Drive folder, with subfolders for subject area and topic. As the teachers went through the year and taught certain topics, they added images from Google and elsewhere to the shared folder. Since many topics span grade levels, it was easy for teachers who needed images for a topic to find what they needed to enrich learning and make input comprehensible. The teachers still continue to build and use this shared resource of visuals for their ELLs.

Another great way to make oral speech comprehensible is to use a lot of gestures and body language, or to even act things out for and with students.

Making input comprehensible does not mean "dumbing it down".
Its important to remember when you focus on comprehensibility that you are simplifying the language, not simplifying the content. It is possible to convey complex ideas in simple language, especially if you are using appropriate scaffolds and supports, as discussed last time!


Wednesday, May 10, 2017

Modifying Instruction for Newcomer ELLs: Scaffolding and Supports


So, last time, I introduced you to 7 ways to modify instruction for newcomer ELLs. The first one on the list was Scaffolding and Support, so that's what today's post is going to focus on. You might want to put on a helmet, because I'm about to throw a lot of information your way!


What is scaffolding & support? 
Scaffolds and supports are strategies used by the teacher or tools that are provided to the learner. These tools and strategies provide students the "boost" they need to be able to access the content, understand input, and communicate knowledge despite a lack of English proficiency.

Doesn't scaffolding make it too easy? What if they don't need it? 
Scaffolds are essential for newcomer ELLs. ABSOLUTELY. ESSENTIAL.

As students gain proficiency, you can easily remove scaffolds and supports that you have put in place to allow them to function more independently! Scaffolds can also be switched so that you can use them to support students in reaching beyond their current level of proficiency.

What students will need to access the language and content will vary from student to student and based on the student's actual level of proficiency. It's important not just to consider their overall score, but also their scores for each subdomain- students may need more support in one language domain than in another.


Scaffolds should be appropriate for proficiency level!
If you remember in my last post, we talked about what newcomer ELLs are able to do in terms of processing and producing language. For our newcomer students, we are providing very simple input with simple sentences, common phrases, and basic words and expressions. Our expectations regarding production should be based around learned words and phrases, small chunks of language, and basic vocabulary usage. This is what we need to be scaffolding students toward, so the strategies we use and the supports we choose should be geared toward that level of language proficiency.

What types of scaffolds and supports can I put in place? 
As you know, I'm in a WIDA state, so when introducing teachers to scaffolds and supports, I always turn first to those three types identified by WIDA- Graphic, Sensory, and Interactive. The suggestions contained within the chart are really just a jumping-off point- this list is certainly not exhaustive.


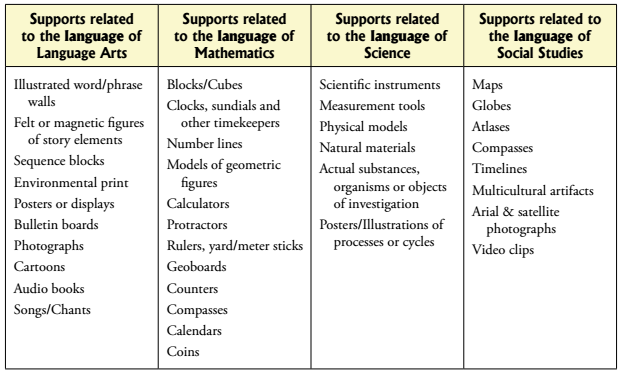
WIDA also offers a list of possible supports divided by content area. Again, this list is not exhaustive!

Here are some of my favorites scaffolds and supports for newcomer students, all of which are pretty easy to begin implementing:
  • Personal Word Walls: Personal word walls are a great tool to provide your newcomer ELLs! They can fill theirs with words they need to learn and carry it from class to class. With each new word, they can include a drawing or even the word in their native language. You can also use Picto4Me to create personalized, visual word walls!
  • Word banks: Word banks are one of the easiest tools you can include for your ELLs, especially on activities where they're expected to produce language. For newcomers, one of the most difficult things is often remembering the vocabulary they need in order to express an idea or demonstrate knowledge. Word banks for newcomer ELLs should include words that they've already learned and that are relevant to the topic.
  • Classroom Word Walls: You may already have a word wall, but are you using it to full potential? Classroom word walls can be an excellent scaffold for newcomers when used effectively- they should be visible, interactive, and relevant . You can also find some excellent math word walls in my TpT store!
  • Sentence Frames: Sentence frames can really help students at all levels, but they're particularly effective for newcomers who have little to no understanding of the structure of the English language. They may have the mathematical ability or scientific knowledge to answer a question, but they don't have the language to communicate their answer. Sentence frames to the rescue! When using sentence frames, review and model them for students so they know how to use them effectively. After a few days of students using these frames in speaking and writing, you can usually remove them!
  • Visuals: The use of visuals is more to provide support to your newcomer as he or she is processing input. If the student can associate a word or phrase with a visual image, then they are more likely to understand and acquire the word into their own "language bank". You can create class picture cards using images from a Google search, insert images into powerpoint, add images to your word wall. Really, any way you can incorporate visuals is excellent. Another great way to incorporate visuals is to use picture dictionaries- ask your ESL/ESOL specialist if they have any you can borrow. Pictured below are some of my favorites from Oxford, or you can also create your own picture dictionary! 

  • Technology: Technology is a great way to help your newcomer ELLs acquire English. As a note though, I recommend no more than 30 minutes of solo computer time a day for newcomers. It is really important that they participate with whole group activities and interact with peers during class time!
    • Learning Chocolate: Great website that helps students practice vocabulary (with visuals) using all four language domains!
    • Quizlet: This is a great choice for helping ELLs learn new vocabulary with pictures and audio. Learn more with this article
    • Read&Write for Chrome: This great tool is from TextHelp, and it has many great functions to help your ELLs, like text-to-speech for reading documents and webpages, translation and annotation tools, and even speech-to-text! Learn more with this article.
    • Rewordify: This is a great tool for simplifying the language used in a text. It's not perfect, but it's a great starting point. Be sure to proofread, and simplify further if needed. Learn more here
I hope these tips, tools, and strategies for scaffolding and support help you as you modify instruction for your newcomer ELLs! Don't miss the next post in the series- Comprehensible Input.


Sunday, May 7, 2017

Modifying Instruction for Newcomer ELLs

One of the toughest situations many teachers- ESOL and mainstream alike- deal with is receiving a newcomer student who doesn't speak any English. How do we include that student in learning activities? How do we ensure that their time at school is spent doing meaningful learning? How do we help that student acquire English? It is absolutely possible to modify your instruction so that your newcomers can not only participate, but learn!


What exactly is a "newcomer"? What comes to your mind when you think of "newcomers"? Share your ideas below. If you have questions about newcomer ELLs, feel free to ask those below too:
Made with Padlet


Just to get started, here are some quick guidelines for working with your newcomer students:

Since this post is about modifying instruction to be appropriate for a student at the very lowest proficiency levels, we are talking about those students who have been here less than a year, and have a very low proficiency in English. On the WIDA scale that we use in my state, that would be 1.0-1.5. These students are new to the country and new to English, too. It's true that sometimes students who are new to the country come with some English proficiency, and these students have different needs.

One of the most important first steps you can take is to find out about the student's educational background. This can help you plan the most effective instruction possible. Here are some great questions to ask the parents (you may need to get a translator!):
  • When did the student start school?
  • How many years of schooling has the student had?
  • Have there been periods of time, other than normal school holidays, where the child did not attend school? If so, how long and why? 
  • Is the child a refugee or has the child suffered trauma prior to coming to the US?
  • Is the child literate in their native language?
  • What is the child's native language
  • Has the child been diagnosed with learning disabilities before? 
Knowing the answers to these questions can help you avoid surprises, and help you to understand where the child may struggle both socially and academically. Knowing the child's background can often be one of the most important pieces of the puzzle. For example, some students may come from a country where their writing system is based on a non-Roman alphabet. In such a case, you will need to start with the very basics of letters and phonics. If the child is not literate in their native language, that will mean starting with letter-sound correspondence and basic print conventions.

If you really want to dig in to student background, I have some native language activities and student background questionnaires in my ESOL Portfolio Starter Pack


Now, once we understand the student's background, we can start looking at the instruction we provide. So, if newcomers have a proficiency level of 1.0 to 1.5, what does that mean? What are these students realistically able to process and produce at this level? Let's take a look at WIDA's performance definitions to see.
The first row pertains to productive skills, like speaking and writing.
The second row refers to receptive skills, like listening and reading. 

In order for instruction to be appropriate for students at this level of proficiency, we need to modify the input we are providing to students so that it is comprehensible and we need to modify our expectations for student expression. As you can see, for our newcomer students that means providing very simple input with simple sentences, common phrases, and basic words and expressions. Our expectations regarding production should be based around learned words and phrases, small chunks of language, and basic vocabulary usage.

When working with teachers of newcomer ELLs, I always recommend starting simple, and modifying instruction in 7 basic ways:

Over the next few weeks, I'll be going over these 7 methods for modifying instruction and providing practical advice, specific strategies, and pictures to show you what it looks like so you can implement in your own classroom.

Don't miss the next post in the series: Scaffolding and Support.


Thursday, May 5, 2016

ELL Strategy: Question Ladders

As teacher appreciation week continues, I wanted to bring you another great tip for working with your ELLs. There's nothing I like better than sharing tips that can make a teacher's life or planning easier!

This strategy is all about helping students develop their own questions and set a purpose for learning or reading. In order to engage students in the learning process and allow them to  become  more independent  learners,  they  need  to  be  able  to  form and ask questions. Not just any questions will do-­‐ we need to teach students to ask high quality questions that can guide reading and learning.  This  strategy  helps  students  generate  questions  for  reading  (or  learning  in  general),  giving them  the  opportunity  to  both  set  a purpose  for  reading,  and  to  make  connections  with  what they  already  know  about  the  topic  from  personal  experience,  prior learning, or previous readings.


Prior  to  reading,  provide  students  with  a  copy  of  the  text.  Allow  students to use headlines, captions, pictures, and section headings to determine the concept or topic of the reading (this is filled into the  first “rung”). Next, students  use  the question  ladder  and  work  independently  or  in  small groups  to  generate  questions  that  they expect  to  be  answered  during  reading.    As  they  read and  find  answers  to  their  questions,  students  can  make  notes  next  to  each rung.


Another  way  to  use this  is to provide  each student with a  copy  of  the question ladder when introducing a new unit of study. The topic of  study  is  filled  into  the  first  “rung”  on  the  ladder, and  then  students  can  work  independently  or  cooperatively  to  generate questions they hope to have answered throughout the unit. These can be compiled on a classroom chart and as students find answers, they can make notes on post-­‐its and place these on the “rungs” of the ladder.

When introducing this strategy, I recommend doing it whole-group style a few times, then in small groups, before expecting students to be able to do it independently.

Scaffolding this for students at different proficiency levels:

  • Beginners (WIDA levels 1/2): Add sentence frames centered around the 5 Ws and H, along with a word bank.
  • Intermediate (WIDA levels 2/3): Add a word bank (question words, content words) to support students
  • Advanced (WIDA levels 4/5): These students should be able to form questions without language supports!


I'd love to hear how you use this strategy in your classroom!


Monday, December 28, 2015

ELL Strategy: Vocabulary Explorers

This strategy focuses on helping students acquire academic language through really getting to know the word- not just the word’s meaning, but how it is used in context. This activity gives students the opportunity to learn and apply new academic vocabulary in a rich, meaningful way.

Each student will need an index card, at least 4”x 6” or larger, and a pencil. Follow the procedure below:

  1. Introduce the word in a meaningful context. All students should hear/see the same context to begin with.
  2. Write the word and definition on the board for students to copy in the upper left hand corner of the index card.
  3. Together as a group, restate or explain the word in the upper right hand corner. Students can also use their own words, depending on level of proficiency.
  4. Work together to create a visual representation- students can use the same one or create their own that makes more sense to them. This goes in the bottom left.
  5. Finally, talk about ways that the word connects to their own personal understanding or experience. Students should fill in personal connections in the lower right corner.
Front of card
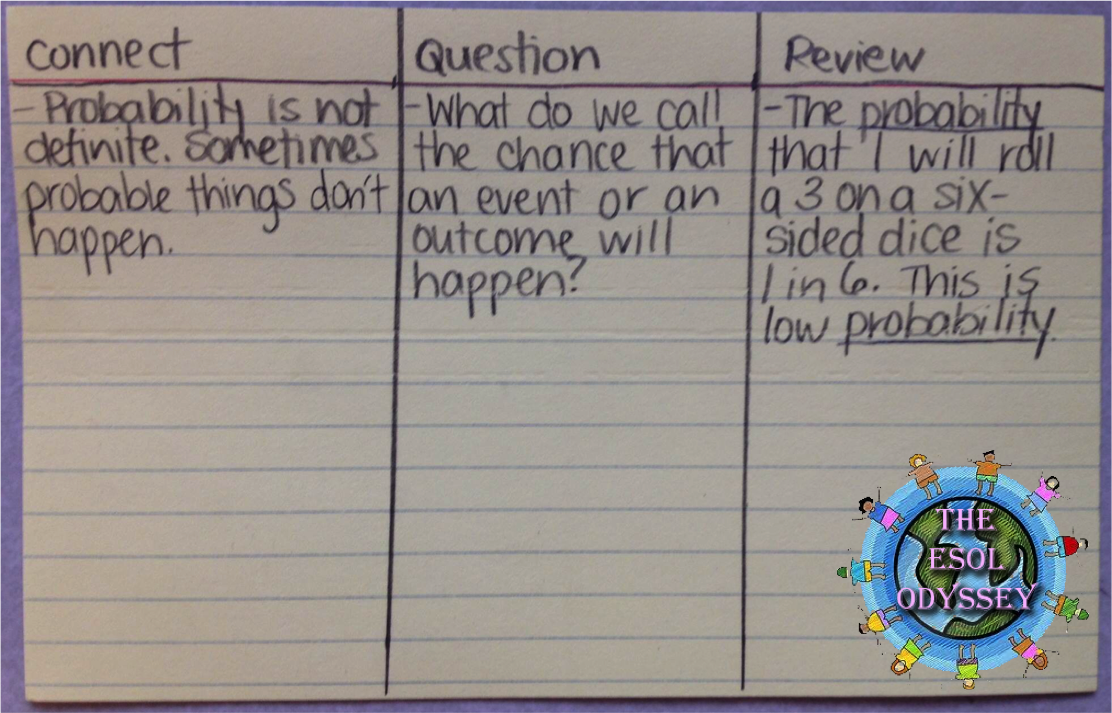
 On the back, the card should be divided into threes. As students learn more about the word or the topic, they can apply and extend their knowledge by making more personal connections, creating questions about the word or questions that the word would answer, and reviewing how the word is used in context.


Back of card
Each student then has their own vocabulary card that they can keep to support and extend their understanding of the word throughout a unit. I like to punch holes in the upper right corner and give each student a large binder ring and a small binder ring. While we are studying the unit that relates to the words, they stay on the small binder ring. When it is time to move on to a new unit, old vocabulary explorer cards are moved to the larger binder ring with other words learned throughout the year.