Showing posts with label ESL Strategies. Show all posts

Sunday, April 8, 2018

Sketchnoting with ELLs

You may have noticed a recent trend in education toward visual notetaking, also called Sketchnoting. This practice has many benefits and applications in education, but I can see this tool as especially beneficial for our English language learners.

What are sketchnotes?
Sketchnotes are rich, visual notes created with a combination of drawings, handwritten notes, and other visual elements such as shapes and arrows. There is no set "format"- your imagination is the limit. Here's an example I created about the elements of fiction:


What are the benefits? 
The value of sketchnoting is supported by several theories, such as the dual coding theory. The dual coding theory (Paivio, 1971), states that both verbal and nonverbal processing are essential for learning. According to the theory, our minds have two separate stores of information (verbal representations and mental images) and learners require both to adequately retain and retrieve knowledge.

By drawing pictures of what they are hearing, students’ minds are engaging multiple modalities which leads to increased retention of information. According to author Wendy Pillars (Visual Notetaking for Educators), sketchnoting or ’edusketching’ can improve retention by up to 55%. This is especially important for students who are learning the content alongside the language. 

The visuals that they create during Sketchnoting can help them make important linguistic connections and support their language growth while helping them retain important content concepts. Since sketchnoting requires students to use both receptive and productive skills, along with higher-order thinking to synthesize information into a sketchnotes, students are being stretched linguistically and thinking critically. 

Sketchnotes also allow lower proficiency beginners to make notes they can understand, while connecting essential vocabulary to rich drawings and visuals, with the opportunity to incorporate their native language as needed for additional support. 

How do I get started?
This video reviews the basics of creating visual notes:


Which tools should I use? 
While there are many tools out there, I like the idea of sketchnoting by hand with paper and pens. According to Muller & Oppenheimer (2014), students who took notes by hand outperformed those who were using laptops for notetaking in conceptual understanding and long-term recall. If you must use technology for sketchnoting, I'd recommend using a tool like Adobe Draw- Sylvia Duckworth has a great presentation on using this tool for sketchnoting.

I prefer to use my RocketBook Wave for sketchnoting (mine was gifted to me at the Google Innovator Academy). I can easily digitize the notes as an image or pdf and send them off to any number of destinations (Drive, email, etc.). When my notebook is full, I can throw it in the microwave with a glass of water and erase it all so that I can reuse the notebook. Super cool!


Are you already using sketchnoting with your ELLs? Tell me how in the comments!


Wednesday, July 6, 2016

Summer PD Series: Academic Language Demands for ELLs

I hope all my US teachers had a fabulous Independence Day! Today continues our Summer PD series with the third installment- Academic Language Demands for ELLs. 


When working with ELLs, we not only need to consider the content that we want them to learn, but the language they need to acquire in order to access the content and be successful with the lesson. In order to be sure that we are providing appropriate scaffolds and meeting students’ language learning needs, it is essential that we take time to analyze the language demands involved in each lesson.


Since I work in a WIDA state, I use the academic language features that WIDA has laid out in order to help me break down the language demands in a lesson. Here are the components that WIDA considers, and the questions that I ask myself when planning a lesson:
  • Vocabulary Usage (Word Level)- What sort of vocabulary must be learned in order for students to access the content and participate in the lesson? What vocabulary is essential for students at all levels of language proficiency? What vocabulary could be useful to teach students at each level to extend their vocabulary beyond the essential terms?
  • Language Forms and Conventions (Sentence Level)- What parts of speech or grammatical structures are used when talking or writing about the topic? When listening to or reading information? Consider grammatical structures, punctuation/conventions, parts of speech, and verb tenses.
  • Linguistic Complexity (Discourse Level)- What organizational patterns are used? How much language do you expect students to produce or process? What sorts of transitions are used?


Take a look at the language analysis chart below for a 4th grade lesson on equivalent fractions.

Levels 1-2
Levels 3-5
All levels
Vocabulary Usage
fraction names:
one-fourth, one-half, three-eighths
greater than, less than, smaller than, bigger than, comparison
compare, denominator, equal, equivalent, fraction, numerator, part, whole
Language Forms and Conventions
- Short, simple sentences

-Compound sentences
-Use of conjunctions, such as “because” or “since” to connect thoughts
-use of comparatives, such as: greater than, bigger than, smaller than

-Present tense verbs
-correct use of is, is not, are and are not
Linguistic Complexity
-no use of transitions to connect sentences and phrases
-paragraph format with cohesiveness and smooth transitions


Example
¼ is equivalent to 4/8.
1/3 is not equivalent to 4/6.
½, 2/4, 4/8 and 8/16 are all equivalent fractions.
When you compare ½ and 5/8 using fraction strips, you find that they are not equivalent because 5/8 is larger than ½.

Supports/
Instruction
-Sentence frames (simple sentences)
-Explicit instruction in the correct use of “is” and “are”
-Sentence frames (compound sentences)
-Explicit instruction in using conjunctions to create compound sentences
Word bank
As you can see, there’s actually quite a lot of language involved in a lesson about fractions, and students must be able to understand and use this language to be able to fully access the content of the lesson. The expectations for each level are shaped by the WIDA performance definitions for each level, and organizing my thoughts into a chart like this also allows me to determine the most appropriate supports or scaffolds to put in place for each level, as well as where brief but explicit instruction in the use of certain language structures might be needed.


I also advocate sharing this chart with mainstream teachers. Language growth and development is not solely the domain of the ESOL specialist- we all share this task. Providing a completed chart to teachers gives them concrete examples of the types of language they should expect students to process and produce during the lesson, as well as suggestions for supports they can provide. Teaching mainstream classroom teachers to use this chart to analyze the language demand of a lesson allows them a way to directly support the language growth of the ELLs in their own classrooms.


Once you’ve fully analyzed the language demands of a lesson and put appropriate supports in place, be ready to watch students soar!


Wednesday, June 29, 2016

Summer PD Series: Cooperative Learning for ELLs

I hope you're having a great summer! Unfortunately, my own summer isn't as relaxing as it could be because we are packing to move! But, I thought I'd take a few moments out to bring you the next installment in the summer PD series!


One of the most important ways ELLs acquire language- and content- is through using the language during interactions with peers. Cooperative learning gives students a chance to process thoughts and knowledge, gain insight into the thought processes of peers, and to learn from one another.

Most importantly, it gives them a chance to use and rehearse the language we want them to learn and remember. Using small group cooperative learning can also make our ELLs feel more comfortable- talking and working with a small group of people often feels safer than whole-group situations in the classroom.

While students do need to be able to work independently using the skills and knowledge they've learned, allowing them to explore that knowledge and practice those skills with their peers prior to independent practice is a valuable part of the learning experience.

With proper scaffolding, even students at the beginning levels of proficiency can participate. As an example, when my 4th graders were doing an activity using fraction strips to find equivalent fractions, we talked about, practiced and posted the names of each of the fractions, along with the sentence frames, The fractions _____ and ______ are equivalent and The fractions _____ and _____ are not equivalent. As I circulated and listened, even my level one student fresh from Ecuador was able to participate fully and communicate her understanding.

The slideshow below outlines several easy-to-implement cooperative learning strategies that can be used in any content area!


Wednesday, June 22, 2016

Summer PD Series: Questioning Techniques for ELLs

Well, today is my FIRST day of summer. WHOO! It started with some Battlestar Gallactica and kitty snuggles. Then I decided to start this summer blog series. I wanted to do a series of quick, short-and-sweet mini-PDs to help teachers as they plan for next year! I'll be covering a variety of topics, starting this week with questioning techniques!


Many times when I visit mainstream classrooms, I see a lack of questions directed to ELLs- even further, those that are directed towards ELLs are often not high-quality questions. There seems to be a pervading belief that ELLs are not capable of reasoning and responding to higher-order questions. As a result, the questions that are directed at ELLs are often lower on Bloom's Taxonomy.

Here's the big secret: ELLs are absolutely capable of higher-order thinking and responding to higher-order questions! We just need to scaffold the language for them so that they are able to demonstrate their understanding.

Here is an example: I visited a classroom a few weeks ago that had just gotten a brand-new student. I was observing a lesson on the American Revolution. The ESOL teacher posed a higher order question, and students wrote their responses. Sentence starters were provided for the intermediate students, and the new student was able to write in Spanish to answer the question. Her answer was absolutely correct, then the teacher and her native language buddy helped her write it in English.

This shows that even if our ELLs don't have the language to express their knowledge and understanding of what they're learning yet, they are absolutely capable of understanding and responding to higher order questions.  We need to scaffold the language to help them!

Questioning can be as simple as asking a question and having students respond thumbs up/thumbs down, or as elaborate as using a tool like Socrative, Plickers or Kahoot. It's a great strategy for helping students monitor comprehension during reading, too.

Questioning also involves having students construct their own questions! In the slideshow below is a little more information, along with a few low-tech options for teaching ELLs to formulate, differentiate, and respond to questions!


Sunday, June 5, 2016

ELL Strategy: Admission Slips

Every teacher on the planet has heard about the exit slip now- they’re a great way to assess student understanding of a topic or what the students learned during a lesson, and can be useful for making instructional decisions.


But, have you ever considered the idea of using an admission slip? An admission slip is a short activity or task that students are asked to complete before a lesson. It can be assigned as homework, or done at the beginning of a lesson as a warm-up, and gives you a chance to assess prior knowledge and help students set a purpose for reading or learning. Additionally, it helps to focus students on the reading or topic of study for the day by preparing questions, responses, ideas or predictions that anticipate the content of the reading or the lesson topic for the day.


Here are some ideas for admission slips:

• Have students look at a series of pictures that are from the text or related to the topic of study and generate three questions they think the text or lesson will answer

• Have students skim an article, looking at the images, headlines and section headings, then make a prediction on what the text is about

• Have students create a KWL chart to determine what they know and what they’d like to know about the upcoming topic of study

• Have students make a few connections between the topic of the reading and their personal experience or existing background knowledge

I would love to hear more about how or if you are using this strategy in your classroom!


Thursday, May 5, 2016

ELL Strategy: Question Ladders

As teacher appreciation week continues, I wanted to bring you another great tip for working with your ELLs. There's nothing I like better than sharing tips that can make a teacher's life or planning easier!

This strategy is all about helping students develop their own questions and set a purpose for learning or reading. In order to engage students in the learning process and allow them to  become  more independent  learners,  they  need  to  be  able  to  form and ask questions. Not just any questions will do-­‐ we need to teach students to ask high quality questions that can guide reading and learning.  This  strategy  helps  students  generate  questions  for  reading  (or  learning  in  general),  giving them  the  opportunity  to  both  set  a purpose  for  reading,  and  to  make  connections  with  what they  already  know  about  the  topic  from  personal  experience,  prior learning, or previous readings.


Prior  to  reading,  provide  students  with  a  copy  of  the  text.  Allow  students to use headlines, captions, pictures, and section headings to determine the concept or topic of the reading (this is filled into the  first “rung”). Next, students  use  the question  ladder  and  work  independently  or  in  small groups  to  generate  questions  that  they expect  to  be  answered  during  reading.    As  they  read and  find  answers  to  their  questions,  students  can  make  notes  next  to  each rung.


Another  way  to  use this  is to provide  each student with a  copy  of  the question ladder when introducing a new unit of study. The topic of  study  is  filled  into  the  first  “rung”  on  the  ladder, and  then  students  can  work  independently  or  cooperatively  to  generate questions they hope to have answered throughout the unit. These can be compiled on a classroom chart and as students find answers, they can make notes on post-­‐its and place these on the “rungs” of the ladder.

When introducing this strategy, I recommend doing it whole-group style a few times, then in small groups, before expecting students to be able to do it independently.

Scaffolding this for students at different proficiency levels:

  • Beginners (WIDA levels 1/2): Add sentence frames centered around the 5 Ws and H, along with a word bank.
  • Intermediate (WIDA levels 2/3): Add a word bank (question words, content words) to support students
  • Advanced (WIDA levels 4/5): These students should be able to form questions without language supports!


I'd love to hear how you use this strategy in your classroom!


Monday, December 28, 2015

ELL Strategy: Vocabulary Explorers

This strategy focuses on helping students acquire academic language through really getting to know the word- not just the word’s meaning, but how it is used in context. This activity gives students the opportunity to learn and apply new academic vocabulary in a rich, meaningful way.

Each student will need an index card, at least 4”x 6” or larger, and a pencil. Follow the procedure below:

  1. Introduce the word in a meaningful context. All students should hear/see the same context to begin with.
  2. Write the word and definition on the board for students to copy in the upper left hand corner of the index card.
  3. Together as a group, restate or explain the word in the upper right hand corner. Students can also use their own words, depending on level of proficiency.
  4. Work together to create a visual representation- students can use the same one or create their own that makes more sense to them. This goes in the bottom left.
  5. Finally, talk about ways that the word connects to their own personal understanding or experience. Students should fill in personal connections in the lower right corner.
Front of card
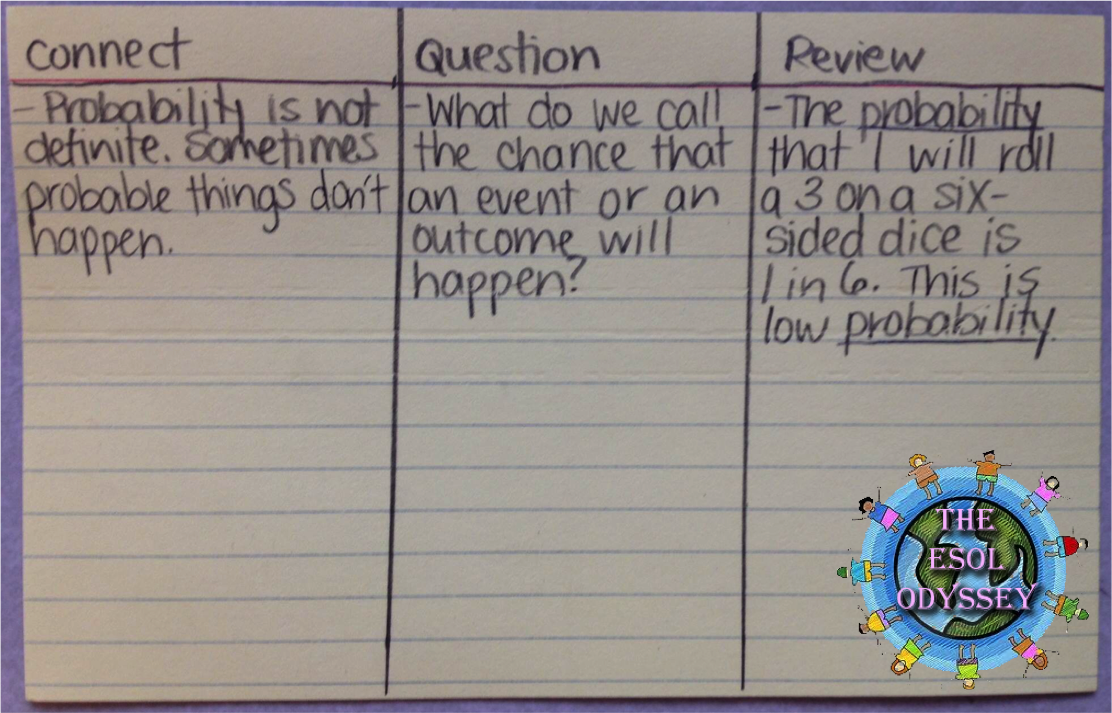
 On the back, the card should be divided into threes. As students learn more about the word or the topic, they can apply and extend their knowledge by making more personal connections, creating questions about the word or questions that the word would answer, and reviewing how the word is used in context.


Back of card
Each student then has their own vocabulary card that they can keep to support and extend their understanding of the word throughout a unit. I like to punch holes in the upper right corner and give each student a large binder ring and a small binder ring. While we are studying the unit that relates to the words, they stay on the small binder ring. When it is time to move on to a new unit, old vocabulary explorer cards are moved to the larger binder ring with other words learned throughout the year.